
Application Note
Measuring Membrane Potential using the FLIPR® Membrane Potential Assay Kit on Fluorometric Imaging Plate Reader (FLIPR) Systems
Table of Contents
- Section I: Introduction
- Section II: Principles of the Membrane Potential Assay
- Section III: Materials and Methods
- Section IV: Troubleshooting Guide
- Appendix A: Consumables Used in the FLIPR Membrane Potential Assay
Section I: Introduction
Ion channels are an important drug target for the pharmaceutical industry. Traditionally, patch clamping, the ìgold standardî, has been the method of choice for measuring changes in membrane potential. Although it is the most informative, this method is very labor-intensive and time-consuming. It does not provide the solution for high-throughput drug screening of ion channels.
Molecular Devices Corporation developed the FLIPR Membrane Potential Assay Kit to provide a fast, simple and reliable fluorescence assay for detecting changes in membrane potential. This assay provides a level of information approaching that of patch clamping. In combination with the FLIPR system, it provides a very good system for high-throughput screening of ion channel drug targets.
For this assay, the cells are typically seeded out in microplates with growth medium first. The dye is subsequently added to the cells and equilibrates across the plasma membrane. The microplate containing the cells is then transferred to the FLIPR instrument where compounds and controls are added to the cells while the fluorescence signal is monitored.
This application note provides a basic protocol for performing a membrane potential assay on the FLIPR system using the Membrane Potential Assay Kit, as well as a discussion of some of the important parameters for optimization and troubleshooting of the assay. Since each cell line has unique properties, the protocol will need to be optimized for each particular assay.
The ìPrinciplesî section of this application note outlines the purpose for each step of the assay. The ìMaterials and Methodsî section details the materials and methods used in the assay. The ìTroubleshooting Guideî provides solutions to some commonly encountered problems. In addition, ìAppendix Aî provides a list of consumables used in the membrane potential assay.
Section II: Principles of the Membrane Potential Assay
Comparison with patch clamping
The FLIPR Membrane Potential Assay Kit combines the benefits of highlyinformative data that is comparable to patch clamping data with the benefits of high-throughput screening achievable using the FLIPR system. The greatest benefit of patch clamping studies is very fast response times, allowing detection of very rapid changes in membrane potential at the single cell level. Dyes that have previously been used to study ion channels on FLIPR, such as DiBAC, have long response times. However, with the new Membrane Potential Assay Kit, response time has decreased. Assays that previously required 10ñ30 minutes using DiBAC on FLIPR, can now be completed in 1-2 minutes. Furthermore, comparison of the data with patch clamping results shows good correlation (see Figures 1 and 2). Both the opening and closing of channels can now be observed. This differs from DiBAC, which very often can show only unidirectional changes in membrane potential (see Figure 3).
The Membrane Potential Assay kit eliminates wash steps. Also, the dye in the kit is much less sensitive to temperature changes than DiBAC; therefore, plates can be set up ahead of time and stacked for batch runs. These features make this assay highly amenable to automation.
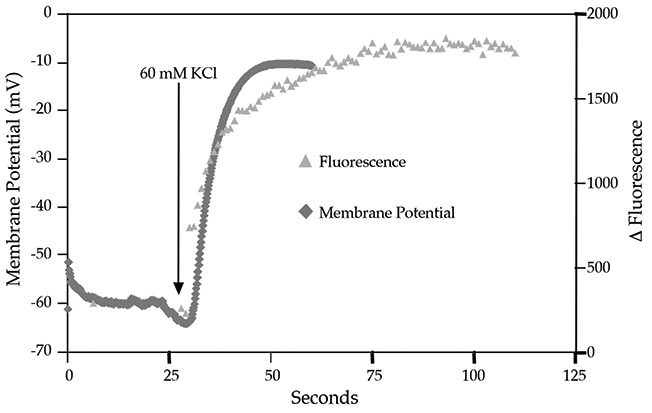
Figure 1: Comparison between patch clamping (mV) and FLIPR (fluorescence) assays on CHO cells expressing a voltage-gated K+ channel. Data courtesy of Dr. Michael Xie, Millennium Pharmaceuticals.
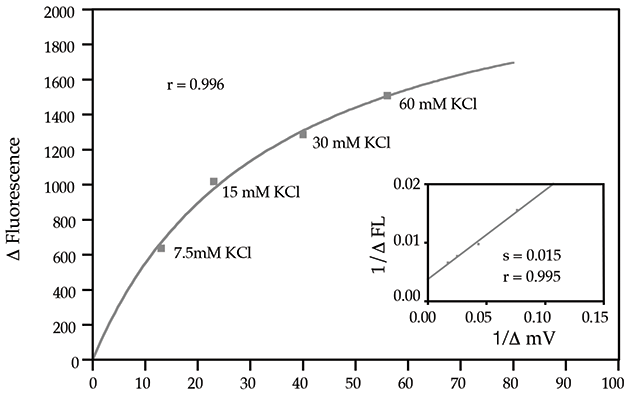
Figure 2: Correlation of changes in membrane potential to fluorescence changes on FLIPR: CHO cells transfected with K+ channel exposed to various K+ concentrations. Data courtesy of Dr. Michael Xie, Millennium Pharmaceuticals
Figure 3: Comparison between the FLIPR Membrane Potential Assay Kit, DiBAC, and Fluo-3 assays on ligandgated Ca2+ channels. Data courtesy of Dr. Michael Xie, Millennium Pharmaceuticals.
Using different types of cells
The FLIPR Membrane Potential Assay Kit is designed to work with many cell types, both adherent and non-adherent. We recognize that a variety of cell handling conditions might be adopted at the discretion of the user, based on standard operating procedures in the laboratory. Optimal cell conditions for the FLIPR Membrane Potential Assay Kit require the creation of a confluent cell monolayer before placing the plates in FLIPR.
Cells are seeded in clear, flat-bottom, black- or clear-wall 384- or 96-well tissue culture plates. The flat bottom ensures that the cellular fluorescence is localized to a single horizontal plane. Adherent cells are seeded the day before the experiment, while non-adherent cells are plated on the day of the experiment. All steps are carried out in the same 96- or 384-well plate. The basic steps of the assay are:
- Plate the cells
- Dye-load the cells
- Assay the cells in the FLIPR system
It is necessary to optimize the cell seeding density so that a uniform, 80% to 90% confluent monolayer is formed on the day of the assay. An overconfluent cell monolayer may result in a reduced response of the cells to the testing compounds. Cells that are normally maintained in culture at subconfluent levels should be seeded at relatively low densities. Depending on the individual cell line, attachment matrix coated plates, such as poly D-lysine coated plates, might be required to improve adherence and minimize cellular ìblow-offî during compound addition.
Loading the cells with dye
The dye-loading protocol must be optimized for each cell line to produce the best performance.
Fluorescent dye
The contents of the FLIPR Membrane Potential Assay Kit are optimized to give a robust result when used according to the protocol on the FLIPR system. The dye in the kit is a lipophilic, anionic, bis-oxonol dye that can partition across the cytoplasmic membrane of live cells, dependent on the membrane potential across the plasma membrane. Its fluorescence intensity increases when the dye is bound to cytosolic proteins. When the cells are depolarized, more dye enters the cells, and the increased intracellular concentration of dye binding to intracellular lipids and proteins causes an increase in fluorescence signal. When the cells are hyperpolarized, dye exits the cells, and the decreased intracellular concentration of dye binding to lipids and proteins results in a decrease of fluorescence signal. The dye is excited at the 488 nm wavelength of the argon ion laser.
The composition of the kit is proprietary and the subject of a patent application.
Loading duration and temperature
The optimal loading time will depend on the cell type. Since fluorescent dyes generally are toxic to cells, it is best not to exceed the optimal loading time. A 60- minute loading time at 37 °C is usually effective for most cell lines and is the recommended starting point for assay development.
Note: If loading for 30 minutes yields an acceptable fluorescence signal and a stable baseline, as has been observed for some cell lines, use the shorter loading time. In some cases, incubation at room temperature may work as well or better than 37°C.
Compound plate preparation
Depending on its complexity, preparing a compound plate can take a variable amount of time. Therefore, it is best to plan your experiment carefully to ensure that the compound plate will be ready for use as soon as the cells are ready. This means that you may need to prepare the compound plate before you add the Loading Buffer to the cell plate.
Polypropylene plates are recommended to limit sticking of the compounds to the plastic surface. Using V-bottom 96-well plates to hold the compounds will minimize the dead volumes in the compound plate. Dead volume in compound plates is approximately 50 µL for flat-bottom plates and 10 µL for V-bottom plates using the FLIPR pipettor.
The compounds should be prepared at 3X, 4X or 5X the final concentration depending on the addition volume and the volume of buffer in the cell plate. These volumes may change, depending on the following considerations: the compound's mixing efficiency, the adherence of the cells, and the kinetics of the cellular response.
Membrane potential measurements need to be performed quickly to capture rapid cellular kinetics. Therefore, it is necessary to pipet the compounds into the cell plate rapidly and to effectively mix the fluids in the wells. However, adding compounds too rapidly can dislodge some types of the cells from the plate. Larger volumes mix more rapidly in the wells than smaller ones. However, smaller sample volumes cause less disruption to the cell layer and allow the same compound plate to be used for multiple cell plates. To avoid dislodging weakly adherent cells, smaller compound volumes should be added to the cell plate, and the pipettor should dispense the compounds at a relatively low speed.
Note: Typically, the pipettor mixing feature is not used with Membrane Potential Assay Kit. Due to the rapid signal updates, mixing during the rise of the signal may cause artifacts.
FLIPR system setup parameters for membrane potential assays
A filter must be installed in the Filter #2 position of the FLIPR system prior to running the assay. Remove the filter holder located inside the filter door of the FLIPR by releasing the two thumbscrews holding the filter holder in place, and slide the holder out onto a clean or towel-lined bench top. Filter #2 location should be empty. Remove one ring by unscrewing in a counter-clockwise direction. Carefully place the 540ñ590 nm BP Emission FLIPR Filter in the #2 location and screw the ring back in place with the notches facing outward. Place the filter holder in its correct position in FLIPR.
Checking the basal fluorescence signals
Choose Filter #2 in the experimental setup of the FLIPR software. Start with the laser power, camera f-stop, and exposure time settings shown in Table 1. These settings are the most frequently used to measure basal fluorescence signal.
Table 1: FLIPR hardware settings for a cell plate basal fluorescence signal test.
At the beginning of a data run, perform a ìsignal testî to check the basal fluorescence signal (i.e., prior to compound addition) from the cells. It is best to work with a basal fluorescence signal of 20,000 to 30,000 counts above background (saturation of the camera occurs at 65,000 counts). The difference in laser power used on the FLIPR I system and on the FLIPR384 system is due to the difference in the way the excitation light scans the plate. The laser power required on the FLIPR384 system is typically twice as high as on the FLIPR I system to obtain the same basal fluorescence signal.
Adjusting the basal fluorescence signal
Adjust the following parameters to obtain an acceptable basal fluorescence signal:
Exposure time
If the basal fluorescence signal is too high, the exposure time can be decreased to a minimum of 0.05 second. If the basal fluorescence signal is too low, the exposure time can be increased, but the sampling interval will have to be increased to a minimum: exposure time + 0.6 second (it takes 0.6 second to integrate data).
Camera f-stop
Increasing the camera f-stop number decreases the opening of the aperture. If the basal fluorescence signal is too high, increase the f-stop from 4.0 to 8.0. If the basal fluorescence signal is too low, the laser power may be increased. f/2 is the largest aperture opening setting for the FLIPR system.
Laser power
Increase the laser power if the basal fluorescence signal is too low, or decrease it if the basal fluorescence signal is too high. During the assay, the laser power should range between 0.300 W and 1.000 W on the FLIPR I system, 0.600 W and 2.000 W on the FLIPR384 system.
Exposure time
Note: Although there are three parameters to adjust the basal fluorescence to the desirable range, most users modulate two of the three parameters: the laser power and the exposure time. Most users keep the camera f/stop constant from plate to plate.
Pipettor parameters for membrane potential assays
The FLIPR system software allows you to set the temperature of the assay chamber and the fluid dispensing parameters.
Assay temperature
Because the dye in the Membrane Potential Assay Kit is much less sensitive to temperature changes than DiBAC, most assays are run at room temperature. However, it has been observed that some compounds/cell types respond better when the assay is run at physiological temperature. You may choose to activate the heaters either by selecting the heating option for the FLIPR I system, or by setting up the heated stage and selecting the heating option on the FLIPR384 system. Make sure you allow a minimum of 30 minutes for equilibration of the instrument temperature before the assay
Pipettor height
For 96-well pipettor, after the pipettor picks up fluid from the compound plate, it draws a small bubble of air into the bottom of each pipet tip to ensure that fluid doesn't leak out. The bubble will be the first thing out of the pipet tip when fluid is dispensed. To avoid blowing bubbles in the wells (which can cause random light reflections and spurious signals), it is best to start dispensing with the tips above the fluid level in the wells. It is also preferable to have the pipettor tips submerged after the addition has been completed to ensure complete sample dispensing. If the pipet tips are in the air at the end of the fluid delivery, a drop can form on the end of the tip due to surface tension. Therefore, the pipettor height should be set somewhere above the starting fluid volume in the wells, but below the final volume after the addition. For example, if the wells contain 100 µL and the sample volume to be added is 50 µL, the pipettor can dispense the compounds from a height of 120ñ140 µL.
The fluid surface in a 384-well is a deeply curved meniscus. Therefore, it is recommended that the pipettor height to be set to correspond to the fluid volume in the cell plate prior to compound addition.
Fluid dispensing speed
The default pipettor dispensing speed is 50 µL/sec for 96-well plates and 20 µL/ sec for 384-well plates. Table 2 provides the limits for the fluid dispensing speed for both 96- and 384-well plate formats.
Table 2: Fluid dispensing speeds
These values must be experimentally determined for each cell type, but it is generally preferable to dispense as fast as possible to enhance mixing of the compounds in the wells. The trade-off is that the pipetting speed must not be so forceful as to dislodge cells from the well.
Section III: Materials and Methods
Materials and equipment
- FLIPR System with the 540-590 nm BP Emission FLIPR Filter installed (Molecular Devices Corporation)
- Membrane Potential Assay Kit (Molecular Devices Corporation, R-8034)
- Clear, flat-bottom, black- or clear-wall 384- or 96-well plates (see consumables list in Appendix A)
- Clear, polypropylene compound plates (see consumables list in Appendix A)
- Cells of choice in suspension
- Growth medium
- Test compounds
- Incubator (5% CO2, 37 °C)
- Centrifuge
- Pipettor and sterile tips suitable for use with microplates
- 1N NaOH
Cell preparation
Step 1 Use cell suspensions at 100 µL/well for 96-well plates and 25 µL/well for 384-well plates. Non-adherent cells are plated on the day of the experiment. It is recommended that you then centrifuge the plates at 1000 rpm for up to 4 minutes with the brake off. Adherent cells are seeded the day prior to the experiment and incubated in a 5% CO2, 37 °C incubator over-night. To create an 80% to 90% confluent cell monolayer, it is recommended the cells be seeded at densities shown in Table 3.
Adherent cells (x10
4
cells/well)
Non-adherent cells (x10
4
cells/well)
Table 3: Recommended cell seeding densities.
Dye Loading
Preparation of Loading Buffer
The following procedure is designed for ten 96- or 384-well plates using either adherent or non-adherent cells prepared as described above.
Step 2 To prepare the 1X Reagent Buffer, dilute 10 mL of 10X Reagent Buffer (Component B in the Membrane Potential Assay Kit) to 100 mL with distilled water, adjusting to pH 7.4 with 1 N NaOH.
Note: Occasionally a white precipitate will form in the 10X Reagent Buffer bottle. This is normal and will not affect the assay.
Step 3 Remove a vial of FLIPR Membrane Potential Assay Reagent (Component A in the Membrane Potential Assay Kit). Dissolve contents of vial completely by adding 10 mL of 1X Reagent Buffer. Mix by repeated pipetting until the contents are completely dissolved. Prepare the Loading Buffer by diluting the vial mixture into 90 mL of 1X Reagent Buffer. Multiple washes of the vial are necessary to completely transfer the contents.
Note: The components supplied are sufficient for proper cell loading. For optimum results it is important NOT to add any additional reagents or change volumes and concentrations.
Loading Cells Using Loading Buffer
Step 4 Remove the cell plates from the incubator or centrifuge. Do not remove the supernatant. Add an equal volume of Loading Buffer to each well (100 µL per well for 96-well plates, 25 µL for 384-well plates).
Step 5 Incubate the cell plates for 1 hour at 37 °C. In some cases, incubation at room temperature may work as well or better.
Running the membrane potential assay on FLIPR
Step 6 After incubation with the Loading Buffer, transfer the plates directly to FLIPR and begin the assay as described in the FLIPR system manual. Recommended experimental setup parameters are given in Table 4.
Table 4: Experimental setup parameters.
Note: The FLIPR Membrane Potential Assay Kit is optimized for addition of antagonists as well as agonists. For 96-well plates, add 50 µL to each well and for 384-well plates add 25 µL. Addition volumes of agonist do not change, but concentrations and pipettor height do change.
Section IV: Troubleshooting Guide
This section presents solutions to problems that users may encounter.
- Fluorescence drop upon compound addition
- When incubating cells for long time periods (e.g. over one hour), a large drop (5-10K fluorescent units) may occur on compound addition on the FLIPR system. This drop is most likely due to dislodging cells from the wells during compound addition. Optimize the assay by shortening incubation times, plating cells on poly-D-lysine coated plates, and/or slowing FLIPR addition speeds.
- Increase in fluorescence
- An increase of fluorescence may be observed upon buffer only challenge. This increase is most likely due to a response of endogenous ion channels to increasing ionic strength. Patch clamping data supports this observed change. The choice of cells and expression levels of endogenous channels can greatly influence resting and changing membrane potentials. Match the compound addition buffer to the buffer in the cell plate (culture medium plus dye loading buffer) so there is no change in ion concentration upon compound addition.
- No response
- If there is no change in fluorescence, the assay may need to be redesigned. Recommendations include: longer incubation and assay times, and choosing a different buffer, such as Tyrodeís or specific ion-free buffers. For example, if studying a calcium channel, dye load cells using a calcium-free buffer and prepare your compound plate using a calcium containing buffer.
- Effect of DMSO on membrane potential assays
- High concentrations of DMSO are toxic to many cell lines, and affect compound mixing. Also, DMSO can induce physiological changes in cells (e.g., differentiation). If the test compound preparation contains DMSO, it is important to titrate the DMSO to determine the maximum concentration that can be used with each indicator cell line and test compound. With some cell lines that have been tested, there was no effect on signal level up to 1% DMSO final concentration.
Appendix A: Consumables Used in the FLIPR Membrane Potential Assay
800-856-0734
203-639-2404
Black wall plates, clear bottom, tissue culture treated, sterile, 96- well,
poly-D-lysine coated
Black wall plates, clear bottom, tissue culture treated, sterile, 96- well,
collagen coated
Greiner U-bottom
polypropylene
800-856-0734
203-639-2404
Black wall plates, clear bottom, tissue culture treated, sterile, 384-well,
poly-D-lysine coated
Black wall plates, clear bottom, tissue culture treated, sterile, 384-well,
collagen coated
800-635-5577
408-747-1700
800-752-8585
408-734-8500
Alternative tips for FLIPR
384
96-well format: Autotips, black, non-sterile, 96-well, 200 µL
800-752-8585
408-734-8500
For FLIPR
384
quadrants: Micro Autotips black, non-sterile, 96-well, 50 µL
800-752-8585
408-734-8500
800-635-5577
408-747-1700
800-752-8585
408-734-8500
800-635-5577
408-747-1700
800-635-5577
408-747-1700
800-635-5577
408-747-1700
800-635-5577
408-747-1700
Other items needed and used in a cell culture facility:
800-522-7763
508-541-0444
- 5 mL, 10 mL, 25 mL sterile serological pipettes
- Rechargeable pipettor for 2ñ25 mL pipettes
- Sterile tissue culture water
- Gloves
- Culture medium to grow cells
- EDTA and Trypsin/EDTA to lift cells
- Hemacytometer and counter
- Sterile test tubes 15 mL and 50 mL, or smaller tubes for compound dilutions
- 1 N NaOH solution
TRADEMARKS: FLIPR is registered trademark of Molecular Devices Corporation. All other trademarks are the property of their respective owners.