
Application Note
Making GenePix Array List (GAL) Files
Jack Ye Zhai, Ph.D.
Axon Instruments, Inc., Union City, CA
Last Updated: July 5, 2001
Introduction
The power of microarray technology is its ability to extract fluorescence measurements from thousands of features simultaneously. Each feature must have the correct ID and Name assigned for meaningful post-acquisition analysis. The GenePix Array List (GAL) file contains specific information for the layout of each block, and the identity of each feature within a block of a microarray.
Various arrayers are available for fabricating microarrays, each using a specific print head configuration and printing parameters. Because of this flexibility, each can have unique multi-well plate file formats. This significantly increases the complexity of creating a GAL file. Axon Instruments provides the Array List Generator (ALG) application with GenePix Pro software package, that can create a GAL file for arrayers that utilize the Stanford-style printing procedures. Because of the increasing flexibility and diversity of arrayer platforms, it is generally preferable that array lists are generated by the arrayer software. Alternatively, the GAL file can be created manually using Microsoft Excel, or in certain cases, the ALG can be used. The ALG has been designed for generating GAL files based on the configuration of the Stanford-style arrayer. Using the defined printing parameters and the multi-well plate information files, ALG converts a location on a specific multi-well plate to a specific feature on a microarray. The result of the deconvolution is a file that indicates, for each spot on a microarray, the origin of the material from a single well of a multi-well plate. This deconvolution process requires a thorough understanding of the configuration of the arrayer.
Since there are several types of arrayers, it would be difficult to discuss all possible situations. In this application note we focus on a specific example of how a GAL file can be made from an array list based on the configuration of the Stanford type arrayer using the ALG. This note concludes with a discussion of how a GAL file can be made without using the ALG.
Methods & Results
Printing Features on the Slide
The ALG converts plain text files or ATF files into GAL files. A typical arrayer has a single print head that contains a number of printing pins. A single print head may contain one or many pins. On the Stanford-type arrayer, these pins are laid out in a square format, for example 4 × 4. The ALG is set by default to act on

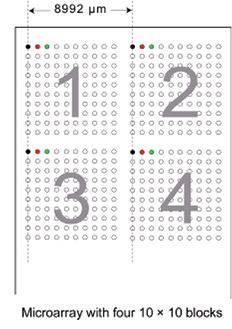
Figure 1: Relationship between multi-well plate and microarray.
'Stanford-style' microarray files. For instance, there are four blocks numbered 1 through 4 that correspond to pins 1 through 4 of the arrayer print head. The first pass of the arrayer produces spots in the top left corner of each block, at the same position on each block. The second pass prints the spots immediately to the right of the previous spot. When the predefined block width has been reached, printing starts on the next row. This continues until the total number of multi-well plates has been processed. Figure 1 shows the arrangement of spots when a 2 × 2 arrayer prints four 10 × 10 blocks.
Generating GAL Files using the ALG
Having provided information about print head configuration and printing parameters, we now introduce the procedures to generate GAL files with the ALG.
1. Generate multiwell plate input files (see Figure 2).
Plain text multi-well plate files (array lists) are generated with Excel. The file must contain entries for Row, Column and ID. In each file, the column titles should be Row, Column, ID, Name, and Plate (for files describing more than one plate) in any order, but the Name and Plate fields are optional. If the column titles do not match these, then you will be prompted to match your column titles to Row, Column, ID, Name and Plate. There can be extra columns of information, but these are ignored by the ALG. Entries must be separated by tabs, so that an input file has the format outlined below.
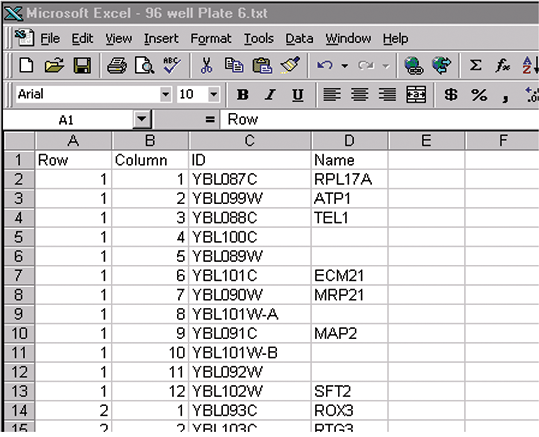
Figure 2
The names and IDs can contain any characters (e.g., space, comma, and periods) apart from tabs. In each file, you must include Row, Column and ID entries for all feature-indicators in each block, even if they are blank.
Microarrays can be printed from 96-well plate(s) or 384-well plate(s). In a 96-well plate file there are 12 columns and 8 rows. In a 384-well plate file there are 24 columns and 16 rows. Rows and Columns can be specified numerically (e.g., for Row 3, Column 2, enter 3,2) or alphanumerically (e.g., C,2) as shown above. ALG assumes the multi-well plates are oriented in the arrayer such that the first sample picked up is from well A1, and that the arrayer moves down the rows then across the columns.
2. Input multi-well plate text files into ALG.
The plain text multi-well plate file(s) made with Excel must be put into the ALG as shown in Figure 3.
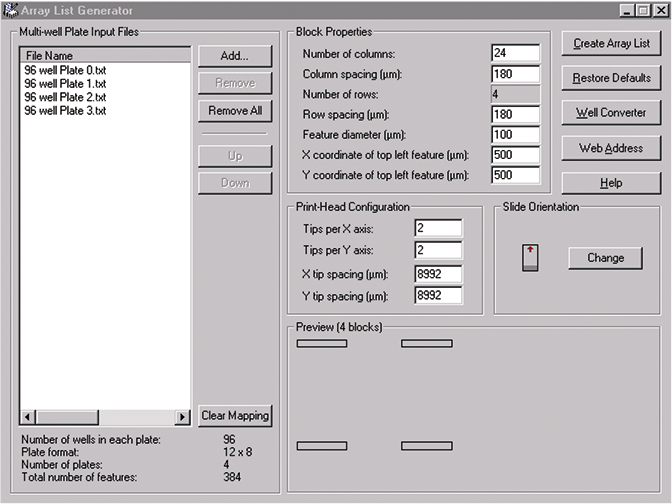
Figure 3
In this example, four 96-well plate files are put into the ALG by checking on the “Add” button. Click on the “Remove” button to remove all highlighted files from the File Name list. Click on the “Remove All” button to remove all files from the File Name list. The ALG assigns IDs and Names in the order the multi-well plate files appear in the list.
Click on the “Up” or “Down” buttons to move a highlighted file in the File Name list.
The plate file information is shown at the bottom of the dialog box.
The same basic steps apply to 384-well plate(s). Please note the entries in the ALG must be either all 96-well or all 384-well plates, the plate entries must be the same type.
3. It is possible to convert four 96-well plates to one 384-well plate format. The ALG also has a utility called Well Converter that creates a 384-well plate file from four 96- well plate files. It does this by taking the row and column information from four 96-well plate files, and converting it into row and column information in a 384-well plate file. Input files can be plain text or Axon Text Format (ATF); output files are in ATF. Well Converter output files are used as input files for the ALG.
When creating a 384-well (24 × 16) plate from four 96-well (12 × 8) plates, one can use an 8-pipette robot or a 12-pipette robot. Select 8, 12 or 96 heads, depending on the pipette that was used to create the 384-well plate. Interleaving the samples from the 96- well plate in the 384-well plate typically does this:
A. When using an 8-pipette robot, two columns from the 96-well plate are interleaved in a single column of the 384-well plate;
B. When using a 12-pipette robot, two rows from the 96-well plate are interleaved in a single row of the 384-well plate;
C. When using a 96-pipette robot, there are two common spotting orders:
i.) Zigzag, in which the spotting order for the four plates is A1, A2, B1, B2 respectively;
ii.) Clockwise, in which the spotting order for the four plates is A1, A2, B2, B1 respectively (See Figure 4).
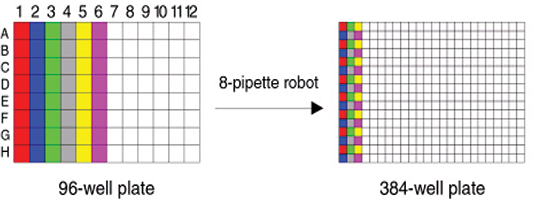
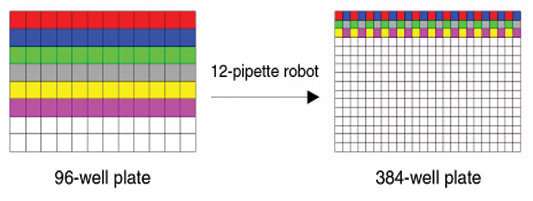

Figure 4: Well plate transfers.
4. Set “Block Properties”
The parameters required in this list refer to how each block of features on the microarray was printed. If you do not know the measurements required, you could calculate them using the pixel coordinates displayed in the Feature Viewer. Pixel size is determined by the scanning resolution (e.g., 5, 10 µm).
A. “Number of columns”: Enter the number of columns of features in each block (i.e., the number of features in each row).
B. “Column spacing”: Enter the distance between features in the x-direction in microns, i.e., the horizontal distance between adjacent features.
C. “Number of rows”: This field is not usereditable; it is calculated from the data in the Multi-well Plate Input Files.
D. “Row spacing”: Enter the distance between features in the y-direction in microns, i.e., the vertical distance between adjacent features.
E. “Feature diameter”: Enter the diameter of each feature in microns.
F. Enter the x-coordinate of the top left feature, i.e., the horizontal distance in microns of the top left feature from the left edge of the scanned image.
G. Enter the y-coordinate of the top left feature, i.e., the vertical distance in microns of the top left feature from the top edge of the scanned image.
5. Select a “Print head Configuration”
If a print head with 4 pins laid out in a 2x2 format with a 9 mm X, Y tip spacing (\~9000 um) is used, then each pin is used to print a “block” of features. Therefore, in the “Preview” there are four blocks. This displays a preview image of the block configuration that is currently defined from the parameters currently entered in the Array List Generator.
When you have imported the multi-well plate files in the correct order, and selected the correct spotter size, select the Create Array File button to create the GAL file. This button opens a file dialog box where you are prompted for a file name and saving location. This creates a *.gal file that you can load as an array list within GenePix. The Array List contains array and block dimensions and names associated with each feature-indicator. Once imported, these names are used in the Feature Viewer, the Feature Pixel Plot dialog box and the Results and Scatter Plot tabs, correlating individual features on an image with the names and IDs for each feature.
Generating GAL Files Manually
For arrayer parameters different from the Stanford format the ALG cannot be used to generate a GAL file. Instead, GAL files must be created manually in a spreadsheet such as Microsoft’s Excel. Two examples of GAL files are shown in Figures 5 and 6.

Figure 5: Example 1.
Description of Making a GAL File in Excel
GAL files conform broadly to the Axon Text File (ATF) format depicted above. These files are created in Microsoft Excel by saving an Excel spreadsheet as Text (Tab delimited). GAL files consist of two sections: the header, and data records. The header contains all the structural and positional information about the blocks; the data records contain the name and identifier information for each spot. The GAL file in Figure 5 describes four blocks ("BlockCount=4"), each with 12 columns and 2 rows. For simplicity, we have included the data record information (ID, etc.) only for the first 15 features.
The header section describes basic file information and all block properties apart from names and IDs (which are in the data records section). Each record is explained below.
ATF 1.0
The first line of an ATF file is required. It is the same in all GAL files: File formats (ATF) and version (1.0).
7 5
The second line of an ATF file is also required.
7: It is number of optional header records; this is the number of subsequent rows in the GAL file before the row containing the data record headers.
5: It is number of data columns. In this example 2, the number of subsequent rows is 13 and the number of data columns is 5 (Block, Row, Column, ID, and Name).
Type=GenePix ArrayList V1.0
This is type of file; it is the same in all GAL files. The space between GenePix and ArrayList is essential.
BlockCount=
Determine the number of blocks of features on your microarray, and enter this number in the same cell as the "BlockCount=" field (as in the examples). In Figure 5, example 1, it is 4; in
Figure 6, example 2, the number is 10 because there are 10 blocks in the GAL file.
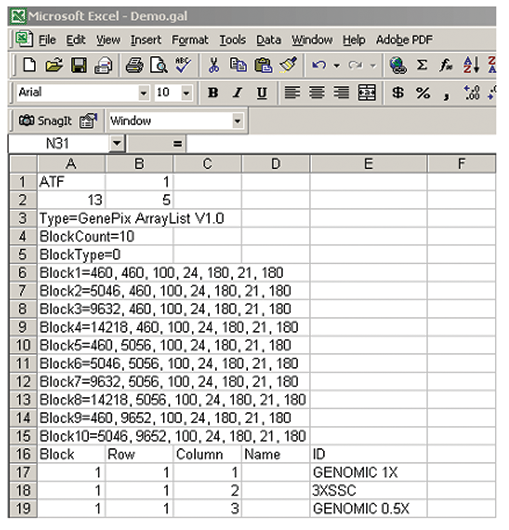
Figure 6: Example 2.
BlockType=0
Type of block described:
0 = rectangular.
1 = orange packing #1.
2 = orange packing #2.
They are the same for examples 1 and 2.
Block(n)
Fill in the rest of the header information, which consists of the 7 block properties after each of the "Blockn=" fields. A comma and a space separate each number. There is one record for each block, and each record contains 7 fields. Each field is separated by a comma followed by a space.
XOrigin X position of center of top leftmost feature
of current block (in µm).
YOrigin Y position of center of top leftmost feature of current block (in µm).
FeatureDiameter Diameter of features within the current block (in µm).
xFeatures Number of columns of features in current block.
xSpacing Column spacing of current block (in µm).
yFeatures Number of rows of features in current block.
ySpacing Row spacing of current block (in µm).
Note: Positions on microarrays are measured in microns with respect to the origin, which is the top left corner of the microarray.
Description of Data Records
The Data Record section contains records that describe each feature in detail. It includes the block, column, and row numbers for features, as well as descriptive name and identifier information. It is last line of the header. There is one record for each feature, containing a field for each of the descriptive columns:
*Block *the block number for the feature (required).
*Row *the row location within the block (required).
*Column *the column location within the block (required).
*ID *Unique identifier for each feature (required).
*Name *Name to be displayed for the given feature.
Block, Row, Column and ID are required fields. The five fields can be in any order.
Note: if you do not have an ID for a printed substance, you can use 'empty' as the ID, and the feature is flagged absent when the GAL file is opened by GenePix.
Fill in the feature information, which consists of one record containing 5 fields for each feature: block, column, row, ID and name. IDs can be up to 16 characters long, and Names can be up to 31 characters long. Each field goes in a separate cell in Excel.
Finally, save as 'Text (Tab delimited) (*.txt) or as *.gal. Close the file in Excel before attempting to open it in GenePix (this is necessary because of file sharing constraints). The format of the GAL file should look like the demo GAL files above.
Summary
The ALG automatically creates an array of blocks with the number of blocks, row spacing, column spacing and feature-indicator diameter defined by the user. It also previews the array of blocks defined by GAL files. The Load Array List button under the Analyze tab in the GenePix software applies the information in the GAL file to scanned microarray image files. In addition, when a GAL file is imported, the Feature Viewer reports the ID or name associated with a feature when the mouse is placed over it, and an Analysis operation will export these names to the Results tab together with all other extracted data. The Find feature (“binoculars” icon) can be used to search for any Name or ID from anywhere within GenePix.
The current ALG utility is designed based on the configuration of the Stanford type arrayer. Thus, one is only able to use the ALG to create GAL files if the microarrays are printed with the Stanford type arrayer. For those users with non-Stanford type arrayers who would like to use the ALG, we recommend you contact the arrayer company and request that they provide GAL file output in their arrayer software.
Alternatively, one can always make GAL files manually in a spreadsheet program such as Microsoft Excel. The format of the text file is very straightforward, as described above, and can also be found under GenePix File Formats section on the Axon web site at http://www.axon.com/GN_GenePix_File_Formats.html.
In making a GAL file, there are a few things that one has to keep in mind.
1. A plain text editor is unacceptable for composing a GAL file. Use Microsoft Excel.
2. You must use the formatting exactly as described above.
3. In the header section of the GAL file, there must be a space between GenePix and ArrayList (e.g., Type=GenePix ArrayList V1.0). Otherwise, the GenePix software does not recognize the file.
4. Names cannot exceed more than 40 characters in the Name column. If there are more than 40 characters, one can make another column after the Name column to add the extra characters, such as descriptions or comments. However, these descriptions or comments will not be seen in the Results after analysis.